在编写代码之前,我们需要先了解需要先来了解一下Virtual DOM是怎么样构建并渲染到浏览器的,常见的构建Virtual DOM的方法有两种,一种是jsx(react),另一种是template(vue)。
基本原理
React的jsx一般是通过babel的jsx插件编译成createElement[源码],Vue的template也可以通过vue-loader编译成对应的createElement[源码],
然后,在组件被创建并初始化state之后,执行render,将组件的props和state根据jsx(react)或template(vue),生成一个虚拟DOM树
最后所有的VDOM生成完毕之后,将所有VDOM都mount上真实HTML DOM。
Component -> render -> VDOM -> mount -> HTML
VDOM
VDOM的节点是一个简化版的DOM对象,只存储了我们关心的属性,大大提高了DOM操作时的性能。通常一个虚拟节点(VNode)包含:标签名、子节点数组、属性、事件、key和对应的真实DOM。
1
2
3
4
5
6
7
8
| export class VNode {
type: string;
children: VNode[] = [];
props: { propName: string; propValue: any }[] = [];
events: { propName: string; propValue: () => void }[] = [];
key: any;
el: Node;
}
|
这时候再定义一个创建虚拟DOM对象的方法,用于jsx调用,该方法接收三个参数:标签名,标签属性,子标签。返回一个虚拟DOM对象
1
2
3
4
5
6
7
8
9
10
11
12
13
14
15
16
17
18
19
20
21
22
23
24
25
| function createElement(type: string, props, ...children) {
props = props || {};
const vNode = new VNode();
vNode.type = type;
vNode.events = Object.keys(props)
.filter(value => value.startsWith('on'))
.map(value => {
return {
propName: value,
propValue: props[value]
}
});
vNode.props = Object.keys(props)
.filter(value => !value.startsWith('on') && value !== 'key')
.map(value => {
return {
propName: value,
propValue: props[value]
}
});
vNode.key = props['key'];
vNode.children = children;
return vNode;
}
|
render
虚拟DOM挂载到HTML DOM,根据根节点的ID,使用document.createElement将虚拟DOM转成HTML DOM,并挂载到真实节点mountEl下
1
2
3
4
5
6
| function mount(el, vNode: VNode) {
const node = mountVNode(vNode);
if (el != null) {
el.appendChild(node);
}
}
|
根据VNode树生成真实HTML DOM
1
2
3
4
5
6
7
8
9
10
11
12
13
14
15
16
17
18
19
20
21
22
23
24
25
| function mountVNode(vNode: VNode): HTMLElement | Text {
if (vNode == null) {
return null;
}
if (vNode instanceof VNode) {
let el: HTMLElement;
el = document.createElement(vNode.type);
vNode.props.forEach(value => {
el.setAttribute(value.propName, value.propValue)
});
vNode.events.forEach(value => {
el.addEventListener(value.propName.replace(/^on/, ''), value.propValue);
});
vNode.children.forEach(value => {
const subEl = mountVNode(value);
if (subEl != null) {
el.appendChild(subEl);
}
});
vNode.el = el;
return el;
} else {
return document.createTextNode(String(vNode));
}
}
|
定义一个所有组件的抽象父组件,实现组件共有的基础功能
1
2
3
4
5
6
7
8
9
10
11
12
13
14
15
16
17
18
19
20
21
22
23
| interface ComponentProps {
el: HTMLElement;
[key: string]: any;
}
export abstract class Component {
readonly el: HTMLElement;
vNode: VNode;
abstract render(): VNode;
constructor(props: ComponentProps) {
if (props) {
Object.assign(this, props);
}
}
protected mount() {
this.vNode = this.render();
const node = mountVNode(this.vNode);
this.el && node && this.el.appendChild(node);
}
}
|
最后再用定义一个挂载方法,创建组件并挂载到真实DOM,并且按顺序执行生命周期即可
1
2
3
4
5
6
7
| export function renderDOM(componentType: { new (props: ComponentProps) }, props, selector?: string) {
const component = new componentType({...props, el: document.querySelector(selector)});
component.beforeMount && component.beforeMount();
component.mount();
component.mounted && component.mounted();
return component;
}
|
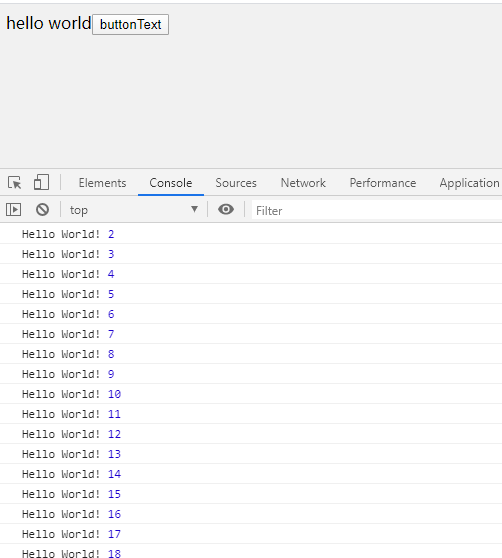
测试运行
Virtual DOM到render的过程基本就完成了,接下来我们定义一个组件,测试调用一下,看看结果
1
2
3
4
5
6
7
8
9
10
11
12
13
14
15
16
17
18
19
20
21
| <div id="el"></div>
<script >
class TestComponent extends Component {
buttonText = 'buttonText';
clickCount = 1;
constructor(props: ComponentProps) {
super(props);
}
render() {
return (<div>
<span >hello world</span>
<button onclick={() => {console.log('Hello World!', ++this.clickCount)}}>{this.buttonText}</button>
</div>);
}
}
renderDOM(TestComponent, '#el')
</script>
|

这仅仅是实现了从Virtual DOM渲染到真实DOM,并没有包含diff算法部分,所以当数据变化之后,并不会重新刷新真实DOM。想要刷新真实DOM,就需要在数据发生变化的时候,根据数据重新render一份vnode树,然后和之前生成的vnode树进行diff并更新真实DOM,具体如何实现diff,后续文章会进行具体讲解。
